WordPress and Amazon CloudFront Best Practices
If you’re running WordPress and want to improve performance globally, Amazon CloudFront is a solid choice. It sits in front of your origin (your WordPress host) and caches static content close to your visitors. You can set it up in minutes with the right approach, but there are a few pitfalls that will cost you time if you don’t know where to look.
Option 1 – Let W3 Total Cache Handle It
If you want to create and manage the distribution manually, skip this part and go to Option 2
The quickest method is to use W3 Total Cache and let it create and configure the Amazon CloudFront distribution for you. Once you’ve linked your AWS account in the plugin, W3 Total Cache will:
- Create a new CloudFront distribution
- Set the appropriate behaviours
- Push the correct cache control headers
- Handle cache invalidations when you update content
If you take this route, you don’t need to touch the AWS console much. You simply enable the “CDN” section, choose Amazon CloudFront, and follow the plugin’s prompts. The downside is that it assumes ownership of the distribution. If you’ve already created your own CloudFront setup, you can’t enable the CDN option without breaking its workflow – so see Option 2.
One important note: W3 Total Cache tells you to use the AWS Policy Generator to create a policy. That generator has a minor bug which means it doesn’t accept global ARNs, such as:
arn:aws:cloudfront::3133731337:distribution/E450918244019If you need to create this kind of policy, you can just put any value as the region, and then delete it before creating the policy in the AWS console.
arn:aws:cloudfront:global_region_value:3133731337:distribution/E450918244019Option 2 – Manual Creation of Amazon CloudFront Distribution
Creation of the Distribution and configuring  SSL / Host Headers
For the purpose of this guide we're assuming you've already setup your DNS to point to Amazon CloudFront, configured SSL (using Amazon Certificate Manager or another service), and you've set the necessary site address. If this is too complex, check out Option 1 instead.

If you need help with any of these items, reach out to our team via the Get Started page - alternatively we will cover SSL setup with Amazon CloudFront in a later post.
If you’d rather not hand over full control of your Amazon CloudFront distribution to a plugin, you can create it manually in the AWS console. This route is useful if you already have a distribution in place for other assets, want tighter security controls, or prefer to define your own behaviours and caching logic without relying on a plugin’s defaults.
Going manual means you’ll need to think through the moving parts yourself. In practice, that boils down to:
- Defining CloudFront behaviours – Decide which paths should be cached and which should bypass the cache. For WordPress, that means disabling caching for dynamic pages like
/wp-login.phpand/wp-admin/*, while leaving the default behaviour to cache your front-end content. These behaviours ensure your origin handles logins and admin work directly, avoiding stale or broken admin pages. - Creating an IAM policy for secure cache purging – If you want WordPress to trigger Amazon CloudFront invalidations automatically, you’ll need an IAM user with the correct permissions (typically
cloudfront:CreateInvalidationon your distribution). This account’s credentials will be used by your purge plugin later. - Installing a purge plugin – With the IAM user in place, install a plugin such as C3 CloudFront Cache Controller. This will send invalidation requests simply through the WordPress console, allowing your authors the ability to provide the latest to visitors without manual AWS console work.
- Configuring cache control headers – Finally, ensure WordPress sends the right
Cache-ControlandExpiresheaders for CloudFront to respect. If you’re using W3 Total Cache or similar without enabling the CDN option, you can still use its browser cache settings for this. Alternatively, a lightweight plugin dedicated to setting cache headers works just as well.
By following that sequence—behaviours, IAM policy, purge plugin, cache headers—you keep the configuration logical and avoid the common pitfall of having cache control rules overwritten by plugins later in the process.
Behaviours in CloudFront
When setting up your distribution, you’ll need to define Behaviors – rules that tell Amazon CloudFront how to handle traffic based on different paths. For WordPress, it’s important to create specific behaviours for the admin and login areas to prevent them from being cached, while ensuring as much of the rest of the site is cached as possible. Utilising Amazon’s managed policies, you can simplify administration while still maintaining the right control
/wp-login.php– HTTP and HTTPS allowed, caching disabled- Viewer Protocol Policy:
HTTP and HTTPS - Cache policy name:
Managed-CachingDisabled - Origin request policy name:
Managed-AllViewerAndCloudFrontHeaders-2022-06
- Viewer Protocol Policy:
/wp-admin/*– HTTP and HTTPS allowed, caching disabled- Viewer Protocol Policy:
HTTP and HTTPS - Cache policy name:
Managed-CachingDisabled - Origin request policy name:
Managed-AllViewerAndCloudFrontHeaders-2022-06
- Viewer Protocol Policy:
- Default
(*)– Redirect HTTP to HTTPS, standard caching- Viewer Protocol Policy:
Redirect HTTP to HTTPS - Cache policy name:
Managed-CachingOptimized - Origin request policy name:
Managed-AllViewerAndCloudFrontHeaders-2022-06
- Viewer Protocol Policy:
Purging
If you prefer to create the distribution manually, you’ll still want a way to purge the cache when you make changes. This is where C3 CloudFront Cache Controller comes in. It’s a lightweight plugin that sends an invalidation request to Amazon CloudFront whenever you update a post or page. This ensures visitors see fresh content without you having to log into AWS.
Cache Control Headers
For performance and SEO, you need the right cache control headers sent from WordPress to Amazon CloudFront. Some plugins, including W3 Total Cache, set these automatically, but only if they control the distribution. If you’ve already created the distribution yourself, enabling W3’s CDN function will cause conflicts. In that case, use W3 purely for browser caching and page caching, leaving the CDN tab disabled. Once your Behaviors are properly configured in Amazon CloudFront, the CDN will honour them and cache your site as requested.
Alternatively, you can follow Option 1 – with a plugin that just sets cache headers without touching your CDN configuration. These work well if you’ve gone down the manual route.
Debugging Common Issues
Redirect Loops
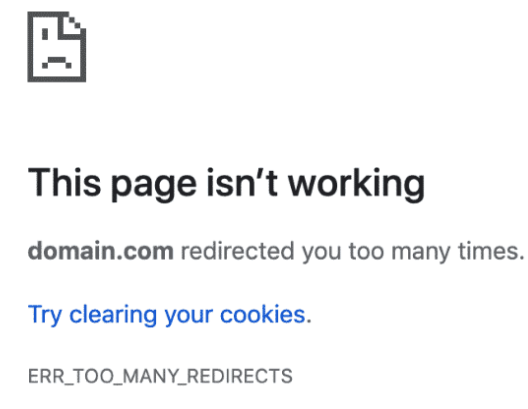
If you find your site’s in a redirect loop, and your browser gives the ERR_TOO_MANY_REDIRECTS or “redirected you too many times” error, there are a few things to check:
WordPress SSL
If your site URL includes https:// but WordPress doesn’t realise you’re using SSL- it’ll recursively issue redirects to SSL. A quick fix is to add the below code snippet to your wp-config.php (before That's all, stop editing!)
if (isset($_SERVER['HTTP_X_FORWARDED_PROTO']) && $_SERVER['HTTP_X_FORWARDED_PROTO'] === 'https') {
    $_SERVER['HTTPS'] = 'on';
}
This tells WordPress to check additional headers to determine whether the request coming in is via HTTP or HTTPS – which is required when your HTTPS connection is terminated by the CDN and then sent to you via HTTP.
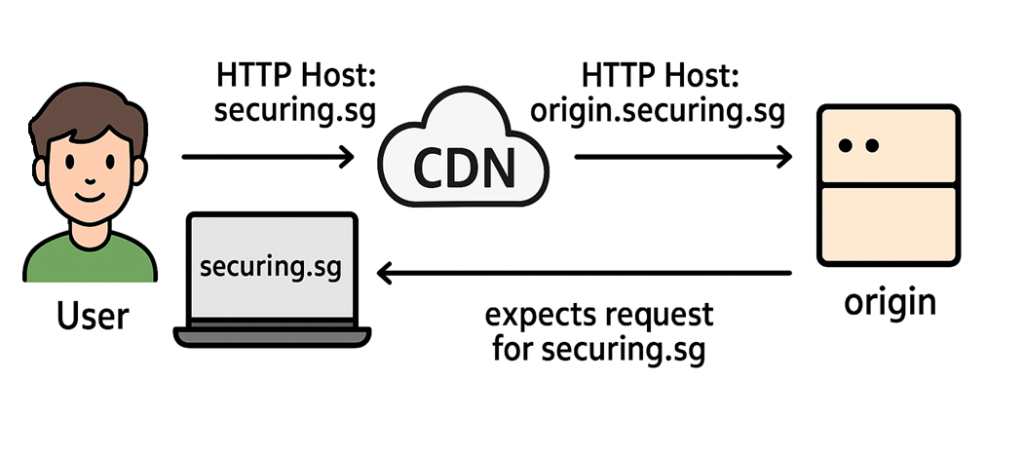
Host Header and Site URL
When a CDN such as Amazon CloudFront communicates to your origin server where your site is hosted, it may try to access your site via a different name to what your end users use to access.
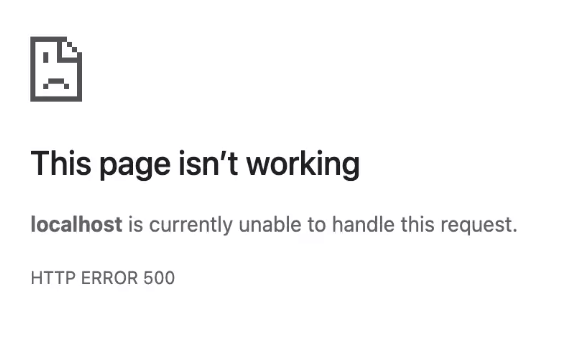
This may also surface as ah HTTP 503 error returned either by CloudFront or your origin:
To resolve this, ensure you’ve configured your CDN to send the Host header from the request to your origin, for instance using an Amazon Cloudfront Behavior of Managed-AllViewerAndCloudFrontHeaders-2022-06 (or the latest) – which sends all request headers to the origin, including Host.

Help Me!
Still having trouble? If you’re having issues with your site and you’d like help from WordPress experts, get in touch and our team will be happy to assist.